Dealing With Flaky UI Tests in iOS
1. Introduction
UI testing is a test technique, besides unit testing, to ensure product quality. While unit testing focuses on small portions (or units) of the system, UI testing aims to cover a wider user journey in the app. This testing technique helps engineers gain more confidence when developing, refactoring, and shipping the products to users. In the context of iOS development, UI testing plays a key role in product quality as the form of a feature shipped to users is usually through what they see on the app.
Despite its benefits, UI testing is also a source of headache when it comes to flakiness. UI tests have a higher level of integration (ie. many components are involved) as compared to unit tests. Therefore, flakiness is always part of the system.
In this post, we are going to discover what fators contribute to test flakiness and how to cope with them.
2. Background
2.1. What is Test Flakiness?
A flaky test is a test that produces different results (passed or failed) each time it runs.
2.2. What is UI Testing?
UI testing is a technique to test features of a software like how a user interacts with that software. This involves testing visual elements of the software. A test action could be a UI interaction (ex. tapping a button, typing an input, etc), or an assertion (ex. checking if a text is displayed).
A typical UI test flow in iOS apps would be:
- Launch the app.
- In the home screen, tap the avatar icon to open the profile screen.
- In the profile screen, check the presence of the name, email of the user.
- Tap the edit icon to edit the profile, then type the new first name, last name.
- Tap save, then expect to see the updated info.
2.3. Two Apps in UI Testing
UI testing in iOS involves two apps:
- Host app, sometimes called app under test (AUT): The app we want to test. The test workflows we expect to see occur in this app.
- Runner app: The app that performs test actions. The code to tap buttons, assert labels In the test case belongs to this runner app, not the host app.
Note that these 2 apps are sandboxed and running in two different processes. Even if a framework (imported in both apps) has a global variable (ex. MyFramework.MyClass.myGlobalVariable), that variable is NOT shared across the two apps.
We can think of a UI test action as an inter-process communication between the runner app and the host app. What happens under the hood during a test execution are as follows:
- The runner app requests/queries for elements of the host app.
- The host app receives the request and returns the matching elements with some attributes (identifier, text, enabled, hittable…).
- The runner app requests to tap a specific element.
- The host app receives the request and performs the tap action on that element.
- …
Some UI test actions such as querying elements, or tapping/scrolling/toggling elements are supported by the XCTest framework. To perform more complicated actions such as triggering a database cleanup, we might need to implement the inter-process communication ourselves. Using TCP socket is a common choice for this purpose.
2.4. Polling-Checks in UI Testing
UI elements do not immediately show up on the screen. The delayed display could be due to animations, or network. Therefore, it is a common practice to do polling-checks in UI testing. The pseudo-implementation would be like this:
func waitForExistence(_ element: XCUIElement) -> XCUIElement? {
  var found: XCUIElement?
  while notExceedTimeout(timeout) {
    if element.exist {
      found = element
      break
    }
    sleep(pollingFrequency) // <-- wait a bit (ex. 0.1s), then check again
  }
  return found
}
In each iteration, we check the presence of an element. If not found, we wait a bit then check again. If the condition does not satisfy within a certain timeout, we throw a test failure.
2.5. End-To-End Testing vs. Workflow UI Testing
Testing mobile app flows usually includes both backend (BE) and frontend (FE). The system under testing (SUT) in mobile testing is the frontend, ie. the mobile app.
When using the real backend in UI testing, this approach is called “end-to-end (E2E) testing”. It involves testing the system from beginning to end (both backend and frontend). Usually, E2E testing is under automation QAs’ maintenance. Meanwhile, UI testing with a mock backend just cares about the frontend. This approach is to ensure app behaves correctly given a stable mock backend. To avoid the ambiguity, let’s call this approach “workflow UI testing”.
In this post, we scope the discussion to workflow UI testing only. We will talk about E2E testing in some upcoming posts. Note that the flakiness we are going to discuss also persists in E2E testing.
3. Contributing Factors to Flakiness
3.1. Shared Environments
Shared resources imply flakiness. Such resources for testing could be mocks/stubs, database, etc.
For UI testing in iOS, the simulator that runs tests can also be seen as shared resources. This is why the execution of a test might be affected by the execution of others on the same simulator. For example, if we toggle a (shared/global) flag in one test and forget to reset it after the execution, this flag might cause failures in the subsequent executions. Keep in mind that flakiness due to shared environments might come from both host app and runner app implementation.
To have better test stability, we need to ensure a clean state before and after running a test by resetting cache, database, flags, keychains, etc. Note that uninstalling the app beforehand does not magically put the app into a clean state as some data is not bound to app’s life cycle. For example, even if the app is uninstalled, keychain values belonging to that app still persist (see: here). This might lead to unexpected behaviors in the next time we install and launch the app for testing. Therefore, it is necessary to have a backdoor for testing to thoroughly put the app in a clean state.
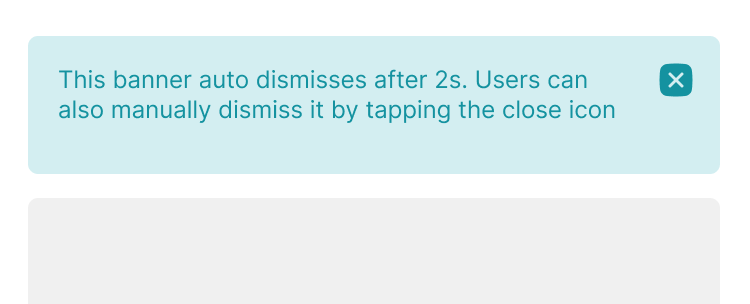
3.2. Auto-dismissable Components
A challenge when testing auto-dismissable components is that we need to check all the details (in such components) in time. Those commonly used components are snackbars, or toast messages. They normally persist for one to a few seconds. While a UI check only takes up a fraction of a second, many checks in the component might exceed the appointed time. Note that when running tests in parallel (ex. 4 simulators), it usually takes a bit longer time than usual to perform a UI check due to high CPU usage.
There are a few actions we can take to tackle this problem.
First, we can inject the display duration of those components when running UI tests. For example, instead of showing snackbars for 1s, we can increase the duration to 3s.
// In the app target
func showSnackBar(text: String) {
  ...
  let defaultDuration = 1.0
  let injectedDuration = ProcessInfo.processInfo.environment["SNACKBAR_DURATION"].flatMap { Double($0) }
  let duration = injectedDuration ?? defaultDuration
  _show(text: text, duration: duration) { ... }
}
// In the test target
class BaseTestCase: XCTestCase {
  let app = XCUIApplication()
  override func setUp() {
    super.setUp()
    app.launchEnvironment = ["SNACKBAR_DURATION": 3] // <-- inject the value
    app.launch()
  }
}
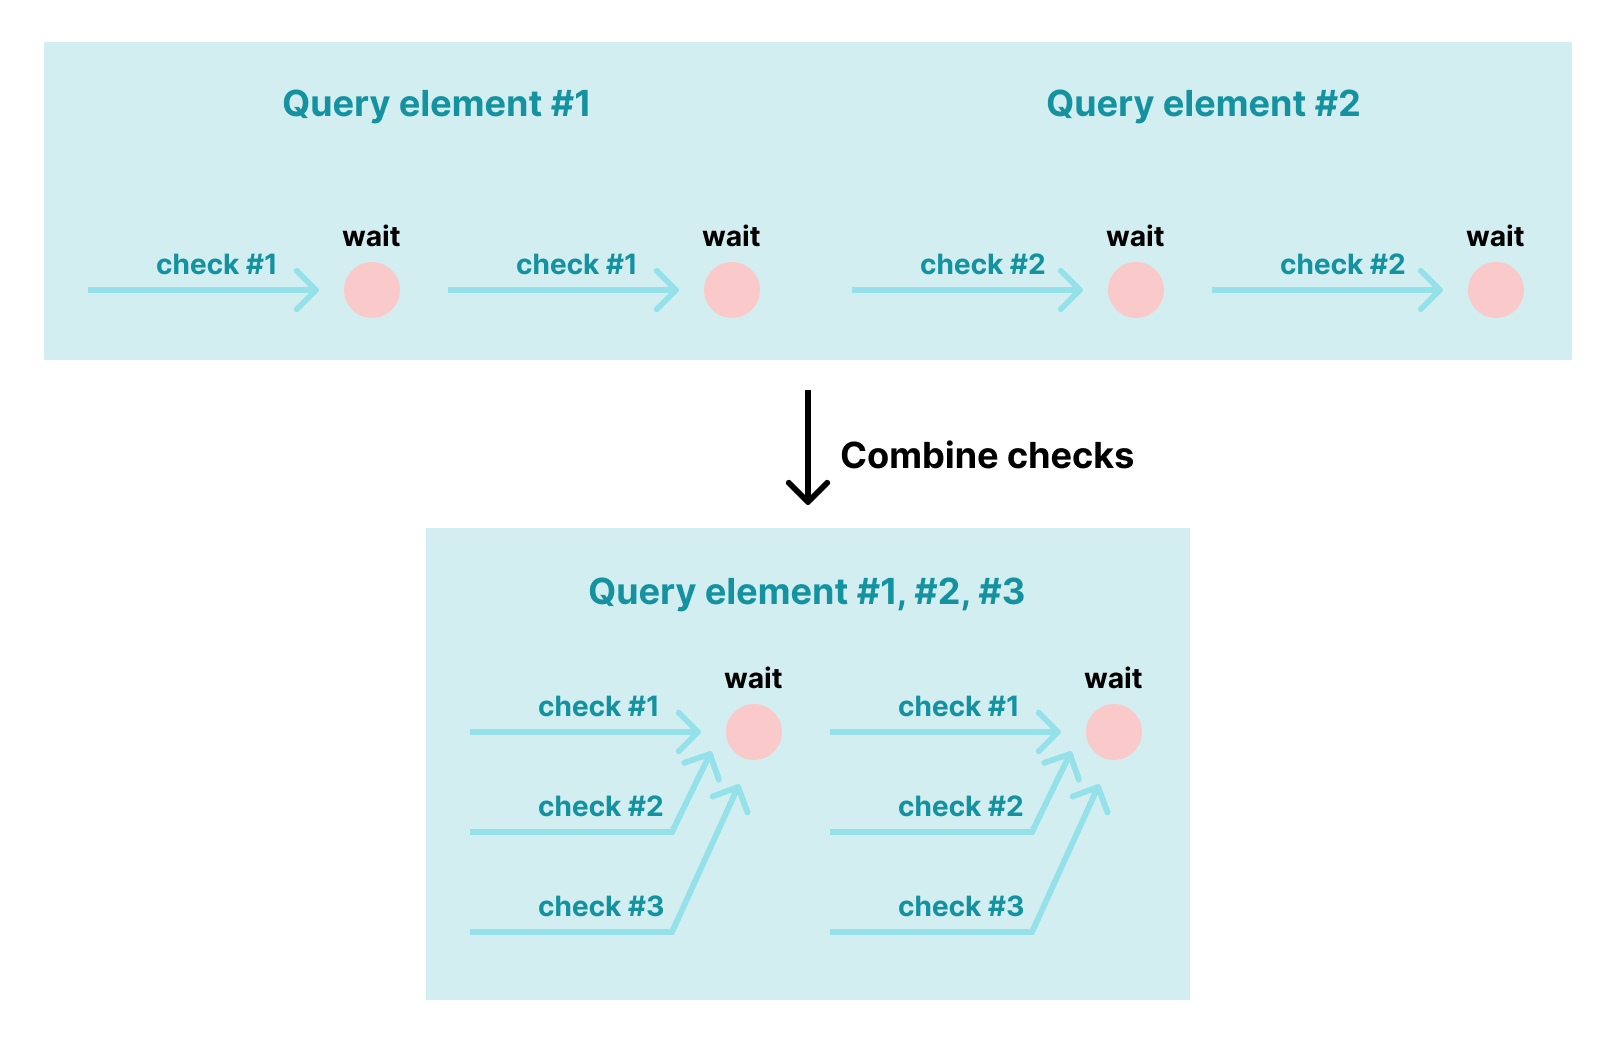
Second, if there are many checks in a UI component, we can combine several checks in one query. Let say, we wish to see 10 elements on the screen. Instead of sequentially checking each element, we can check all elements together in one poll iteration. The polling-check above can be justified for the multiple elements as follows:
func waitForExistence(_ elements: [XCUIElement]) -> [XCUIElement] {
  ...
  while notExceedTimeout(timeout) {
    if elements.allSatisfy({ $0.exist }) { // <-- combine the checks
      ...
      break
    }
    sleep(pollFrequency)
  }
3.3. Animations
Regarding overhead time of an animation, it is not that much as one normally takes less than 2s to finish. We just need to increase the timeout (ex. to 10s) for element checks to gain better stability.
However, animations do have a side effect when running UI tests. This is due to an intentional behavior of the XCTest framework. To be more specific, when running tests, the XCTest framework waits for the host app to idle before performing UI actions/checks. The app is not in the idle state as long as an animation is still on-going. This explains why we sometimes see tons of “Waiting for app to idle” in the console log.
Take the “loading/shimmery UI” for example. This kind of animations happens continuously until the loaded data is presented. Therefore, even if there are contents elsewhere on the screen, the animation still keeps the test from asserting elements.
Another problematic case is when we have animations on auto-dismissable components. The animations prolong the wait time mentioned above. As a result, by the time we check elements on such a component, they are already dismissed.
There are two common approaches to overcome this problem.
First, we can just disable animations when running UI tests.
// In the app target
class AppDelegate: UIResponder, UIApplicationDelegate {
  func application(_ application: UIApplication, didFinishLaunchingWithOptions launchOptions: [UIApplication.LaunchOptionsKey: Any]?) -> Bool {
    if ProcessInfo.processInfo.environment["IS_UI_TEST"] == "YES" {
      UIView.setAnimationsEnabled(false)
    }
    ...
  }
}
// In the test target
class BaseTestCase: XCTestCase {
  let app = XCUIApplication()
  override func setUp() {
    super.setUp()
    app.launchEnvironment = ["IS_UI_TEST": "YES"] // <-- inject the value
    app.launch()
  }
}
This approach has 2 major drawbacks:
- Somewhere in the app code might have
UIView.setAnimationsEnabled(true)to enable animations. Then, the problem happens again. - Many things in the app simply do not work without animations.
The second approach is to suppress the waiting behavior. In case of testing with Appium, there is an option called appium:waitForQuiescence in the desired capabilities to achieve this. Unfortunately, XCTest does not have a public API to do so. Appium makes it work simply by swizzling the corresponding function of XCUIApplicationProcess (a private class in XCTest) (see: here) and doing nothing if the option appium:waitForQuiescence is false. If not using Appium, we can also use the same approach.
3.4. Time-sensitive Data/Non-deterministic Behaviors
If a feature is time-dependant, what we see might depend on the time we execute tests. For example, if a UI component displays differently during daytime or nighttime, tests might fail because the assertion assumes it is daytime while the actual result corresponds to nighttime.
Another notorious time-sensitive data is timezone. When writing tests, engineers often overlook this aspect because most of the time, everyone in the team is in the same timezone. But when their team expands to not just one country, the problem arises. Consider the following example:
- A Singapore-based engineer writes a test with a fixed time (8:00 AM 2022-06-25, local time).
- He/she then asserts seeing “8:00 AM” in the test, assuming that the UI always displays “8:00 AM” as it is using a fixed time.
- This change bypasses CI as the runners are configured with Singapore timezone (GMT +8:00).
- Then a Jakarta-based engineer runs this test and gets a failure because he is seeing “7:00 AM” instead of “8:00 AM”.
In this example, the UI in the 2 timezones are just slightly different. But when we have Seattle engineers (GMT -7:00) contributing to the project, what they see in the app might differ considerably as the local date in Seattle is 2022-06-24 (not 2022-06-25).
Given this annoying disprepancy, many teams usually choose to agree on a default timezone to save the maintenance effort.
3.5. Device/OS Variants
When testing on different device models, we might run into the issue in which an element is visible on iPhone X while it is not on iPhone 7. This frequently happens with table views or scroll views. Therefore, sometimes we need to perform extra swipes/scrolls to make sure the element is in the visible area of the screen.
There are two common failures when running tests on different iOS versions:
- In certain iOS versions, the accessibility IDs/labels of some components are not deterministics. For example, when scrolling a component, the element type of its contents might change (see: here). This kind of weird issues seems to happen more with table views and collection views which have the built-in resuable behavior.
- Some system UI components might change. Examples would be notification banners, or permission alerts.
Similar to the approach to different timezones, we can agree on a fixed device model and iOS version. Yet, it is a bit difficult to stick to an iOS version on CI for all Xcode versions because:
- By default, we only have an iOS runtime that is shipped together with Xcode. For example, with Xcode 12.0 we get iOS 14.0, with Xcode 13.0 we get iOS 15.0.
- Installing other iOS runtimes for CI runners is not straightforward especially when the team does not have full control over the runners.
This explains why Xcode migration occasionally involves fixing UI/unit/snapshot tests. The most noticeable failed tests are those having table/collection views because a new iOS release usually changes themes of those components.
4. Dealing With Flakiness
The measures in this section correspond to 3 stages: before, while, and after flakiness is introduced.
4.1. Preventing Flakiness
During development, we should anticipate possible flakiness and make our code robust. We need to take into consideration the contributing factors mentioned above. The measures to mitigate each of those factors were already discussed in the previous section.
4.2. Troubleshooting Flakiness
When we have flakiness, engineers jump in to investigate and fix the issue. The ability to easily troubleshoot issues matters. As follows are some suggestions to help engineers identify the issues faster.
Processing the .xcresult Bundle
Normally, after running tests, we can just open the reports navigator (in Xcode) to view test results. We can also open the .xcresult bundle (produced when a test session is finished) with Xcode to quickly open this UI.
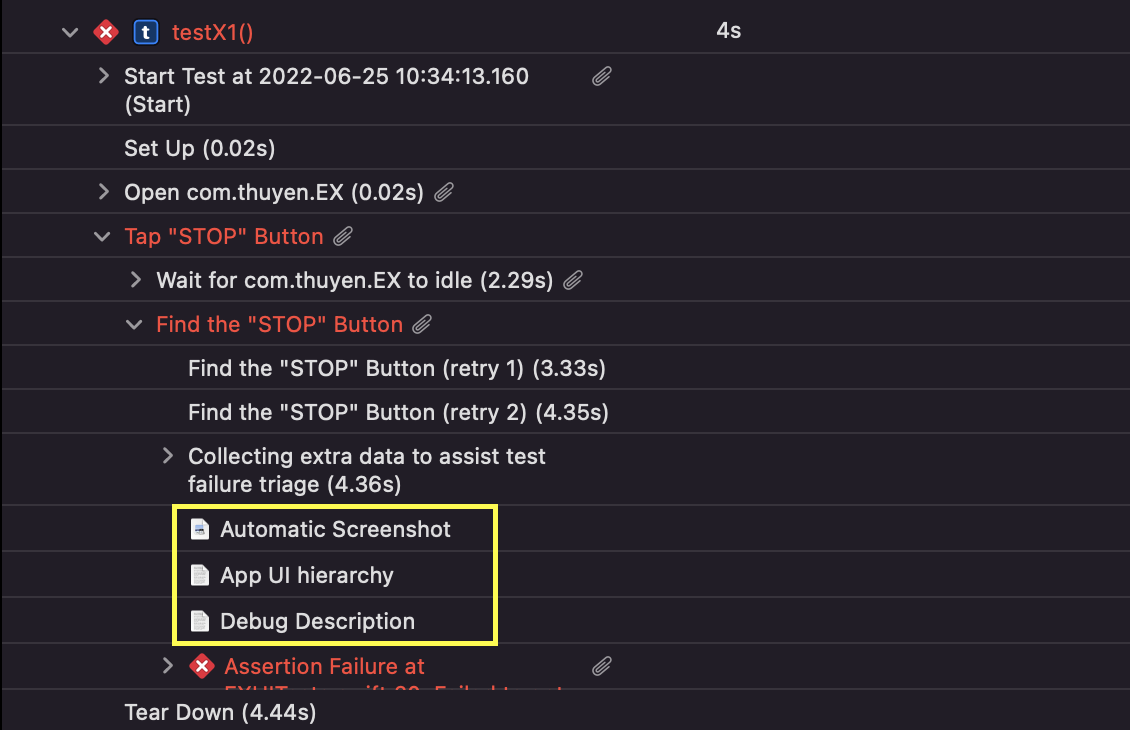
This UI displays quite some useful data for further investigation such as screenshots, and app UI hierarchy. However, the logs of the host app which should reveal much about the root cause are hidden from the UI. Also, when running many tests in one session (this is usually the case for CI), opening the produced .xcresult bundle in Xcode is really laggy, causing a very bad developer experience.
Therefore, to provide the best troubleshoot experience, we need to extract useful data (for investigation) from the .xcresult bundle. Those data include app logs (both the runner app and the host app), screenshots, attachments, etc. They can be easily extracted using xcparse. Alternatively, we can use xcresulttool (which xcparse is using under the hood) to obtain those data ourselves.
Segregating per-Test Data
On CI, many tests are executed in the same session. Some data such as app logs are consolidated for all tests.
It is best to have artifacts of each test separately. This way, we only care about what happened for the test of interest only.
artifacts / MyTestTarget / MyTestClass / testFunction1 / -- screenshot.png
                                                         -- host_app_hierarchy.txt
                                                         -- host_app.txt
                                                         -- runner_app.txt
                                       / testFunction2
Logs in the runner app are well structured. With some regexes, we can easily extract logs of a specific test from the consolidated logs.
Test Case '-[EXUITests.EXUITests testX1]' started.
...
Test Case '-[EXUITests.EXUITests testX1]' failed (4.568 seconds).
...
Test Case '-[EXUITests.EXUITests testX2]' started.
...
Test Case '-[EXUITests.EXUITests testX2]' passed (3.528 seconds).
Meanwhile, logs in the host app do not indicate what test it is running against. One trick to have that info is to pass the test name via launch environment when launching the app. After that, we can use regexes to extract relevant logs.
// In the app target
class AppDelegate: UIResponder, UIApplicationDelegate {
  func application(_ application: UIApplication, didFinishLaunchingWithOptions launchOptions: [UIApplication.LaunchOptionsKey: Any]?) -> Bool {
    if let testName = ProcessInfo.processInfo.environment["TEST_NAME"] {
      print("Test started: \(testName)")
    }
    ...
  }
}
// In the test target
class BaseTestCase: XCTestCase {
  let app = XCUIApplication()
  override func setUp() {
    super.setUp()
    app.launchEnvironment = ["TEST_NAME": self.name] // <-- inject the value
    app.launch()
  }
}
Regarding attachments and screenshots, xcparse does not group them by test. Extra effort (patching xcparse/wrapping xcresulttool) is needed to place them in the respective test dirs. One trick to avoid this effort is to manually collect the screenshot and UI hierarchy in the record(_:) function.
class BaseTestCase: XCTestCase {
  override func record(_ issue: XCTIssue) {
    print("Host app:\n\(app.debugDescription)")           // <-- Dump App UI hierarchy to the console
    app.screenshot().pngRepresentation.write(to: testDir) // <-- Save screenshot to the test dir
    super.record(issue)
  }
}
4.3. Fixing Flakiness
Benchmarking Tests
When fixing a flaky test, we need to ensure the test is stable enough before merging the fix. Therefore, it is useful to benchmark the test on CI.
We have a CI feature that an engineer can benchmark tests on his/her merge requests by specifying the instructions in the merge request description.
This merge request aims to fix `testFunction1` and `testFunction2`.

Benchmark: MyTestTarget/MyTestClass/testFunction1 x10
Benchmark: MyTestTarget/MyTestClass/testFunction2 x5
In the sample merge request description above, the line Benchmark: MyTestTarget/MyTestClass/testFunction1 x10 directs CI to benchmark the test testFunction1 10 times.
To get the list of tests to benchmark in this example, we can send an API request to get the merge request description, then apply some regexes. The benchmark can be done with test repetitions (introduced since Xcode 13), or simply by running xcodebuild multiple times with the given tests.
4.4. Living With Flakiness
As mentioned ealier, flakiness is always part of the system. Zero-tolerance against flakiness would lead to a very bad developer experience. Consider the following scenario:
- A test has been added to the project. It succeeds consistently.
- One day, it fails intermittently on CI for some reasons. This prevents some engineers from merging their changes. Those engineers have to retry the jobs, hoping that it shall pass in the retry.
- Someone in the team has to take actions, to either investigate the flakiness, or temporarily disable that test.
The costs in the above scenario are:
- Maintenance effort of the test owners (not to mention that this effort comes in form of ad-hoc tasks which might intervene in team process).
- Waiting time of the affected engineers.
- Communication effort between the affected engineers and the test owners.
Therefore, we need to design our CI system in a way that flakiness should have minimal impacts on deverloper experiences.
Retrying Failed Tests
This is the most common approach to live with flaky tests. Failed tests will go through several retries. The number of retries might be different for each project. The more retries we have, the longer time it takes to finish the job.
Test Success Rate
The success rate of a test is defined as the number of successful attempts over the total number of attempts. If a test succeeds 9 out of 10 times, its success rate is 0.9.
This success rate is the key metric to evaluate how flaky a test is. A test is considered flaky if its success rate falls below a certain threshold.
Note that not all test executions are reliable. If a test fails on a merge request, the failure might be due to the change instead. Data in some following cases can be used:
- (1) Tests succeeding or failing on the main branches.
- (2) Tests succeeding on merge requests.
- (3) Tests failing in one job and then succeeding when (manually) retrying that job.
Test quarantine Logic
A flaky test is quarantined if its result (success/failure) does not affect the overall result of the job. If all failed tests are quarantined, we are good to go.
--[execute & retry]--> failed --[quarantine] --> all quarantined --> passed
                                           | --> otherwise --> failed
To integrate this quarantine logic, we need to have the stats (test success rates…) of all tests in the project for the past N days. Such stats data is generated from the executions from the project.

By introducing the quarantine logic, we create an auto feedback loop into the development process:
- When a test becomes flaky, its success rate decreases. The quarantine for this test is in effect.
- When this test stabilizes, it success rate increases. Then the quarantine is lifted for this test.
The stats used in the quarantine logic can just be a json file hosted anywhere as long as we can download it. The storage could be an S3 bucket, or a git repo.
{
  "MyTestTarget/MyTestClass/testFunction1": 0.9,
  "MyTestTarget/MyTestClass/testFunction2": 1,
  "MyTestTarget/MyTestClass/testFunction3": 1
}
The whole process from test data submission to stats generation is pretty much like an ETL pipeline. So, you can choose any implementation that fits your need. For us, we use a git repo to reduce the effort for Identity Access Management (IAM). Let’s discuss the detailed setup with a git repo in the upcoming posts.
5. Conclusion
In this post, we cover some background of UI testing and what contributes to test flakiness. Some flakiness can be prevented in the early stage when writing tests and developing features. Despite our prevention measures, flakiness will always persist. Therefore, a long term approach to cope with flakiness should focus on improving troubleshoot experiences, bug fixing experiences, and making flakiness tolerated.